User Tools
This is an old revision of the document!
Table of Contents
Hi guys, I will help you step by step to manually provision a windows machine. ![]()
Introduction
Not long ago, manual provisioning in Juju was possible for linux machines. This feature is quite handy if you want to mange by yourself the cloud or you are providing for your services you own hosted cloud.
Further notes
- Please check the internet connection after the OS install on both machines and be sure that they can connect to the internet.
- Please make sure the hosted machines can ping one each other.
- Please install on client(the controller) the golang compiler and all of the toolchain,env paths that comes with it.(we need it for manually build the juju tool).
- Please install on your client host(the controller, where you will run the commands)some variant http server(example apache, on my machine).
You need to have 2 machine pre installed with an OS
Controller (ubuntu release supported by juju) and windows-machine (any windows os supported by juju)
For this example we are are using this:
     State Machine   : xenial ubuntu   | 192.168.100.101)
     Windows Machine : windows 2012 r2 | 192.168.100.102)
So without further ado let's start the hacking process
Step 1
This step will be entirly on the controller. Seting up the environ for manual compiling, instaling build scripts, make the process more automated
Pop up a bash terminal windows in your controller(juju client machine) and execute din commands in order.
go get -v -u https://github.com/hoenirvili/juju/...
go get -v launchpad.net/godeps
cd $GOPATH/src/github.com/juju/juju
git checkout enable-windows-provisioner
godeps -t -u dependencies.tsv
I will supply here a link to the gist where you could download the build script in order to make the process more simpler.
https://gist.github.com/hoenirvili/3c8f858a3865f3b31a3ee19c58ab2688
Download all scripts in some location ,make them executable and point the path into $PATH env. For example(in my order of things).
SCRIPT_PATH = ~/Documents/scripts/
mkdir -p $SCRIPT_PATH
cd $SCRIPT_PATH
https://gist.github.com/3c8f858a3865f3b31a3ee19c58ab2688.git
mv 3c8f858a3865f3b31a3ee19c58ab2688/* $SCRIPT_PATH
rmdir 3c8f858a3865f3b31a3ee19c58ab2688
chmod u+x *
# I usualy do this in my .profile in my $HOME directory. But you can run the line straight in the
# shell, be careful when you close the bash session you will lose all variables saved, so put
# it somewhere, where scripts will always load when you open a shell.(example .bashrc)
export $PATH:$HOME/Documents/scripts
This is how it should look like after the above steps.

Now you can build the project doing running this command. Read the above Note first before executing this command.
makejuju.sh enable-windows-provisioner
In the uploadtools.sh file make sure on the last line, the path is pointing to the files where the http server has acces to serve them, mine for example is /var/html/ (default on ubuntu systems). To make sure. You cand execute this commands in order.
mkdir -p /var/html/toolsdir
chown -R $USER:$USER /var/html/*
We need to do this because the state machine will access the metadata and download the fresh jujud binary based on a specific series.
Step 2
This setup will show how to create and manage a WinRM(windows remote manager) listeners, how to setup a CA cert for secure interactions with the WinRM protocol.
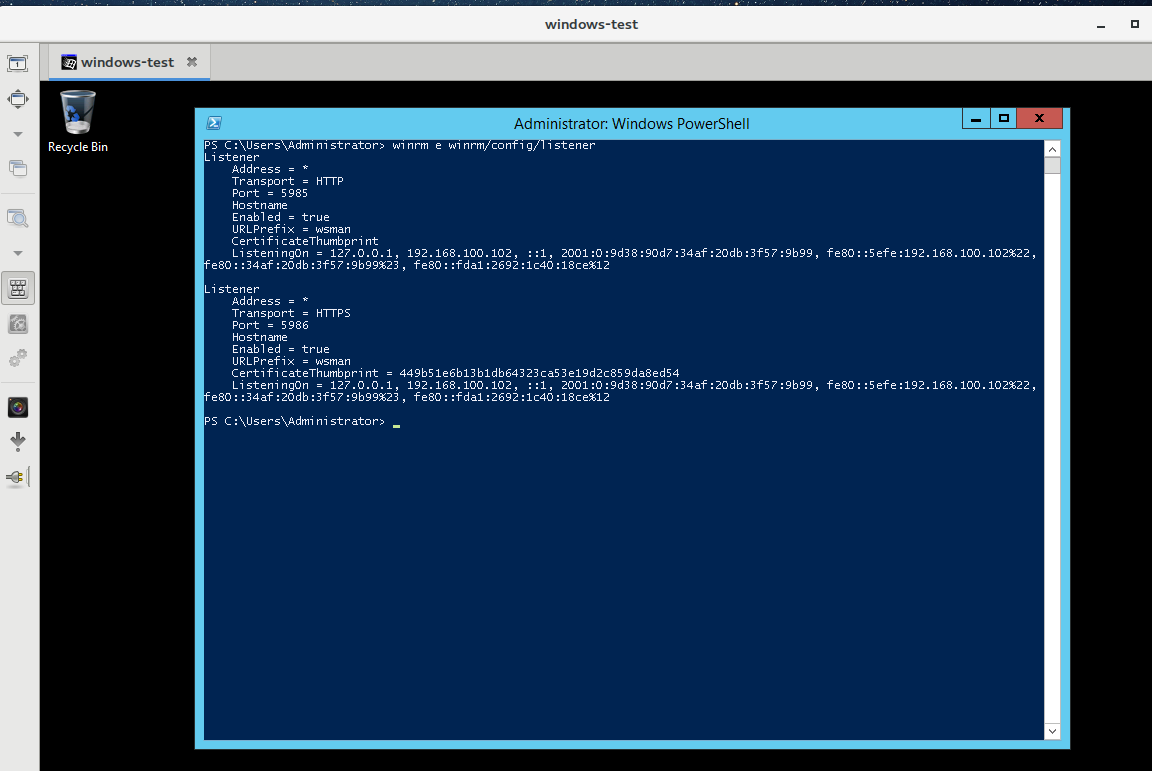
First ,we need check if the windows machine has enabled all WinRM listeners. It's important because, in the provisioning process, the juju client directly communicate, using this protocol in order to fully provision the machine.
This is how would look if both listeners are enabled.
If not you will need to do the steps above.
Open PowerShell console(on the windows machine) and type the following command to enable PowerShell remoting and the WinRM http listner:
Enable-PSRemoting -Force
Set-ExecutionPolicy RemoteSigned
winrm quickconfig

To enable HTTPS listener you must first create a your own self signed CA cert using openssl or makecert. This guide will use openssl.
Download OpenSSL for Windows.
http://slproweb.com/products/Win32OpenSSL.html
Package Win32/64 OpenSSL vx.x.x Light is more than enough for generating SSL certificate.
To add Server Authentication to EKU open openssl.cfg and add extendedKeyUsage setting under v3_ca section:
[ v3_ca ]
extendedKeyUsage = serverAuth
subjectAltName = IP:192.168.100.102
set OPENSSL_CONF=C:\OpenSSL-Win64\bin\openssl.cfg

$host = $env:COMPUTERNAME.ToLower()
C:\OpenSSL-Win64\bin\openssl.exe req -x509 -nodes -days 9999 -newkey rsa:2048 -keyout winrmcacert.key -out winrmcacert.cer -subj "/CN=$host"

C:\OpenSSL-Win64\bin\openssl.exe pkcs12 -export -out winrmcacert.pfx -inkey winrmcacert.key -in winrmcacert.cer -name "HOSTNAME" -passout pass:

Import-PfxCertificate -FilePath .\winrmcacert.pfx -CertStoreLocation Cert:\LocalMachine\My
Import-PfxCertificate -FilePath .\winrmcacert.pfx -CertStoreLocation Cert:\LocalMachine\Root

winrm create winrm/config/Listener?Address=*+Transport=HTTPS '@{Hostname="MAAS-WIN2K12R2";CertificateThumbprint="THUMBPRINT"}'
$host = $env:COMPUTERNAME
$Cert = New-SelfSignedCertificate -CertstoreLocation Cert:\LocalMachine\My -DnsName $host
Export-Certificate -Cert $Cert -FilePath C:\Users\Administrator\cert
mport-Certificate -Filepath "C:\Users\Administrator\cert" -CertStoreLocation "Cert:\LocalMachine\Root"
Enable-PSRemoting -SkipNetworkProfileCheck -Force
New-Item -Path WSMan:\LocalHost\Listener -Transport HTTPS -Address * -CertificateThumbPrint $Cert.Thumbprint –Force
New-NetFirewallRule -DisplayName "Windows Remote Management (HTTPS-In)" -Name "Windows Remote Management (HTTPS-In)" -Profile Any -LocalPort 5986 -Protocol TCP
Add-Content $Env:SystemRoot\system32\drivers\etc\hosts "192.168.100.102 $host"
# now you must reboot the windows machine.
Note:
Don't forget to add those ' around the @{}.
Now this should look like in the first powershell screenshot
I can't stress enough this to make sure we can reach the listeners please add execute this lines.
netsh advfirewall firewall add rule name="Windows Remote Management (HTTPS-In)" dir=in action=allow protocol=TCP localport=5986
winrm set winrm/config/service '@{AllowUnencrypted="true"}'
Now we should make the cert in pem format and copy just pem formated cert over the ubuntu machine
C:\OpenSSL-Win64\bin\openssl.exe x509 -inform DER -in C:\Users\Administrator\cert -out outcert.pem -text
cat outcert.pem
Copy the that starts with —–BEGIN CERTIFICATE—– and ends with —–END CERTIFICATE—–
Step 3
You need to copy the newly CA sever cert on the controller(juju client) in a specific x509 config folder where juju will look on.
You need to store the file with a specific name of winrmcacert.crt
Please make sure that the CA cert is in pem format.
mkdir -p $HOME/.local/share/juju/x509

# make here a quick copy of the CA cert because if something is broken juju will delete the x509 dir and regenerate all the client certs but not the CA.
cp winrmcacert.crt $HOME/.local/share/juju/

# in order to generate the client certs by juju you must hit the command
juju status

# now move the cacert into x509
cp winrmcacert.crt $HOME/.local/share/juju/x509

# If you have some custom client cert please rename them into winrmclientkey.pem and winrmclientcert.crt and move them into $HOME/.local/share/juju/x509

# if you list the dirs you should have something like this.
tree x509/
x509/
├── winrmcacert.crt
├── winrmclientcert.crt
└── winrmclientkey.pem
Step 4
( manual provisioning )
We need to make a new environmnet frist. (juju bootstrap)
juju bootstrap mycloud --debug manual/192.168.100.101 --config agent-metadata-url=http://127.0.0.1/toolsdir/tools --config agent-stream=devel

If you hit juju status we should have an environment set and ready.
juju status

Now for the grand finale.
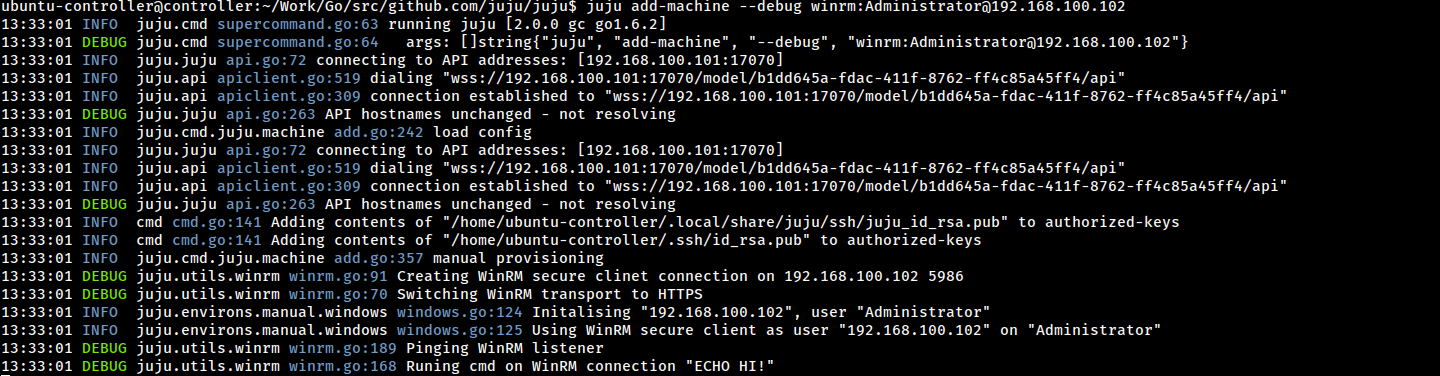
juju add-machine --debug winrm:Administrator@192.168.100.102