User Tools
This is an old revision of the document!
Table of Contents
How to deploy MAAS
This document will describe how to deploy Ubuntu® MAAS supporting some Windows features.
You can find more info about MAAS here: https://maas.ubuntu.com
Note: If you are deploying on a vmware/esxi environment, be sure to change your network adapter type inside your vmx files to e1000e. Do this for every interface. Example:
ethernet0.virtualDev = "e1000e"
This should be the case for all other hypervisors as well. Also, if using KVM/QEMU make sure that the block device controllers are IDE or SATA, unless you have bundeled virtio drivers when creating the PXE installation media.
Prerequisite
Machine 1 – MAAS Controller
- Ubuntu 14.04 Server w/ two NIC's (1 external, 1 private).
- The external is connected to the internet, the private will be used for MAAS deployment.
Example interface configuration:
# The primary network interface (external)
auto eth0
iface eth0 inet dhcp

# The secondary NIC (used internal for MAAS)
auto eth1
iface eth1 inet static
address 192.168.1.1
netmask 255.255.255.0
Machine 2 – Windows Image Generator
- Windows Server 2012 R2/ Hyper-V server 2012 R2
- 1 NIC (external) Important: Machine 2 will need network acces to the Machine 1 samba server.
Machine 3, 4, etc. – MAAS slaves
- Configure one of the NIC's to be connected on the MAAS private network.
- The BIOS/EFI has to be configured for network boot.
Preparing MAAS Controller
Install Ubuntu 14.04 server
Basic install
Add ppa:maas-maintainers/stable
Note: This will add the current MAAS distribution.
sudo apt-get update
sudo apt-get upgrade
sudo apt-get install software-properties-common -y
sudo add-apt-repository ppa:maas-maintainers/stable -y
sudo apt-get update
Install maas
sudo apt-get install maas maas-dhcp -y
Configure firewall and enable ip forwarding
Add the following lines to one of your startup scripts. For most cases, /etc/rc.local should do.
/sbin/iptables -t nat -A POSTROUTING -o eth0 -j MASQUERADE
/sbin/iptables -A FORWARD -i eth0 -o eth1 -m state --state RELATED,ESTABLISHED -j ACCEPT
/sbin/iptables -A FORWARD -i eth1 -o eth0 -j ACCEPT
Enable IPv4 forwarding:
echo 'net.ipv4.ip_forward=1' >> /etc/sysctl.conf
sysctl -p
In this example eth0 is the public interface and eth1 is the private one
Create admin user
Insert password when prompted.
sudo maas-region-admin createadmin --username root --email user@server.com
Import Ubuntu boot images
To import boot images you have to connect to the MAAS API
sudo maas login <session-name> http://<maas-server-ip>/MAAS/ <maas-key>
You create a session with the name <session-name> which you will use when
you want to execute maas commands. <maas-server-ip> is the IP used by your
external NIC (eth0) and <maas-key> can be obtained from the web interface
at http://<maas-server-ip>/MAAS/account/prefs/
Once you are connected to the MAAS API, you can import Ubuntu boot images
sudo maas <session-name> boot-resources import
Test MAAS Web interface
Head to http://<maas-server-ip>/MAAS/ and test if the MAAS webpage loads.
Configure the cluster
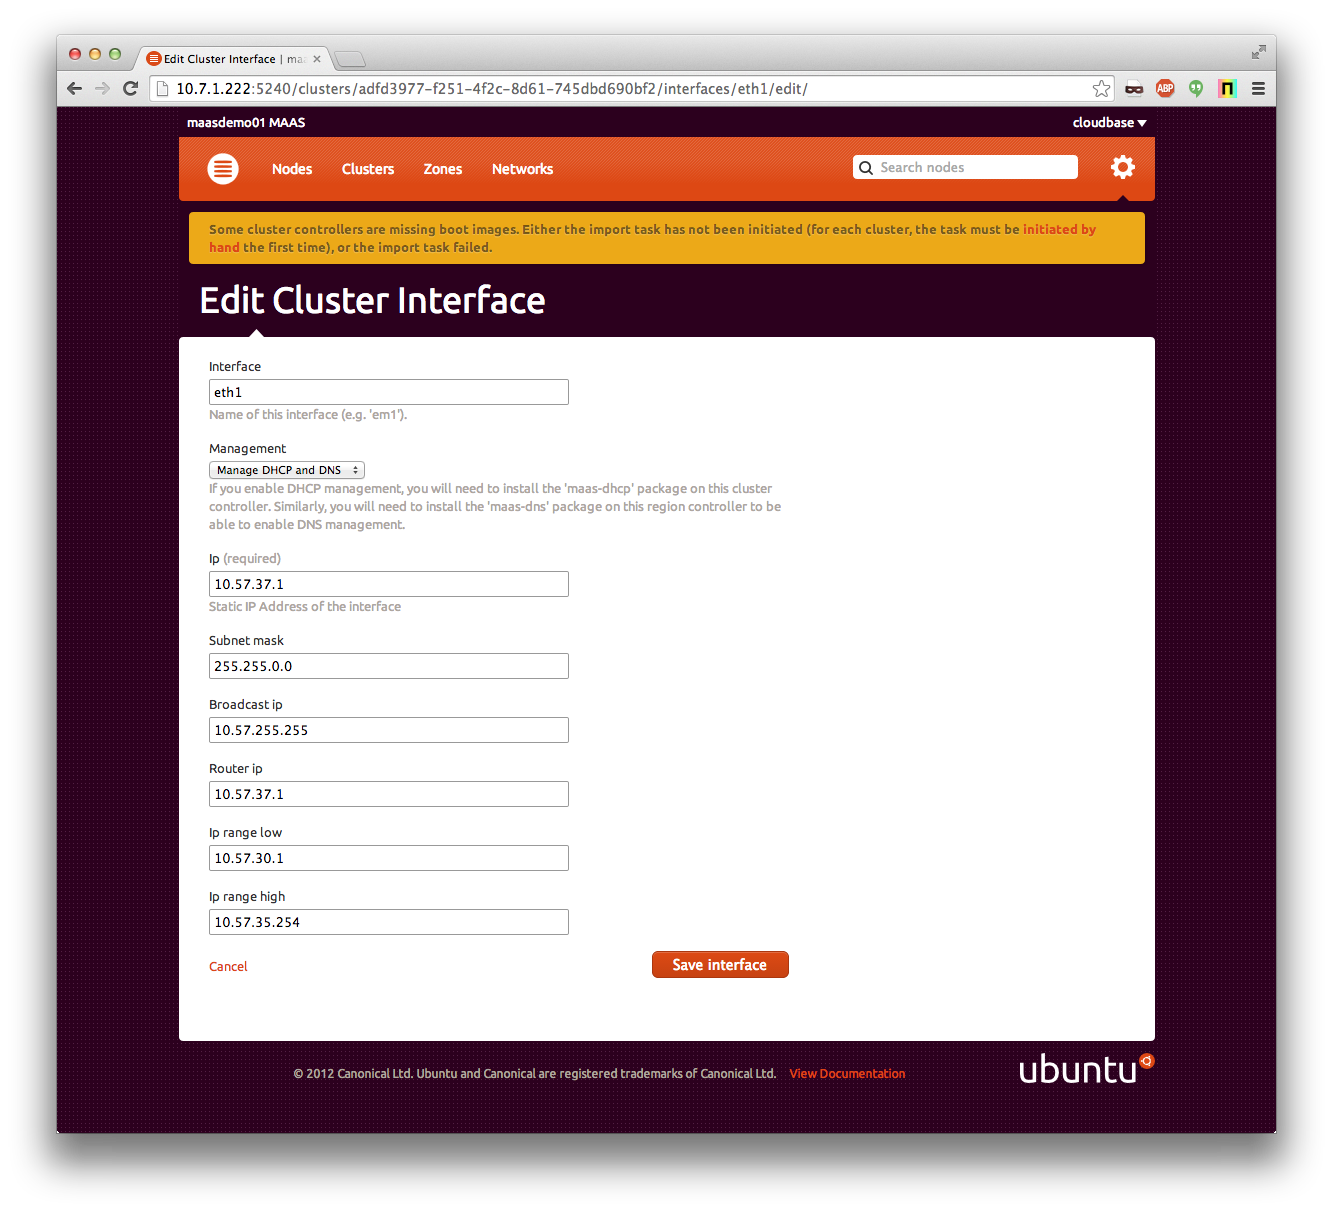
Edit the default cluster and enable DHCP and DNS on the interface where you will be serving DHCP (see the screenshot as an example).
Open http://<maas-server-ip>/MAAS/clusters/ in a browser; eth1 is most probably the one that needs to be configured.
Example: Router IP = eth1's IP* IP = eth1's IP
Set upstream DNS
Open http://<maas-server-ip>/MAAS/settings/ in a browser. Look for "Upstream DNS used to resolve domains not managed by this MAAS" and set the DNS to something like 8.8.8.8
SSH Keys
Add a ssh key for authentification to the nodes
Generate a key:
ssh-keygen -t rsa
cat ~/.ssh/id_rsa.pub
Copy the output.
Open http://<maas-server-ip>/MAAS/account/prefs/sshkey/add/ and paste the contents.
x509 keys
Create a x509 certificate to use with WinRM
maas-generate-winrm-cert
Copy the outputed key to:
Open http://<maas-server-ip>/MAAS/account/prefs/sslkey/add/ and paste the contents.
Creating a windows image for MaaS
To generate a new image for MaaS, you will need the following powershell commandlet:
https://github.com/cloudbase/windows-openstack-imaging-tools
For the moment, this only works on Windows. Please follow the inscructions detailed in the README of the above repo. There will also be an image builder that works on linux as well provided by the MaaS team. Stay tuned.
Uploading a custom image
At the moment the tools necessary to generate these images are not public. There will be a linux version of the tool available soon, and we are working on getting a windows version as well. This page will be updated as soon as they are made available.
maas root boot-resources create name=windows/win2012r2 architecture=amd64/generic filetype=ddtgz content@=/home/maasctrl/windows-win2012r2-amd64-root-dd


